In this article, we’ll go over how to export CSV files from Qlik™’s Catalog into cloud storage.
Qlik™ has multiple cloud storage connectors, including, but not limited to Amazon S3, Azure Storage and Google Cloud Storage.
Follow the steps below to export your data from inside Qlik™ to your cloud storage.
1. Log in to your Qlik™ tenant
2. Click on "New analytics app" to create a new analytics application
3. Go to the "Data load editor" in your new analytics app
This can be done by clicking on the drop down which can be found at the top right of your screen.
4. Create a new "Section"
Do this by clicking on the “+” button in “Sections” pane.
The pane can be found at the left of your screen.
5. Create a connection
This connection will allow you to connect to your cloud storage. To do this, click on the “Create new connection” button, choose a supported cloud storage connector of your choice, fill in the credentials and authenticate. For the purposes of this example, we’ll use Google Drive to store our CSV file, but you’re welcome to choose from the various connectors supported by Qlik™.
After establishing a connection, it should show up in the connections pane, which can be found at the right side of your screen.
6. Load the data from the data catalog
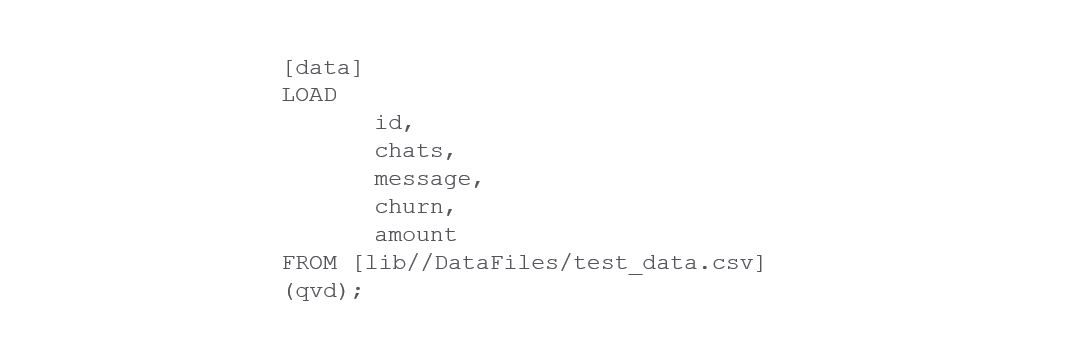
To do this, click on the “Add from data catalog” button at the top right of your screen. Select the CSV you wish to export. Click “Next” and then click “Insert script”. You should now see the “LOAD” script in your scripting pane.
Your script should look like this:
7. Assign this "LOAD" script to a variable to be able to use it in the "STORE" script
To do that, at the top of the “LOAD” script insert the variable name in square brackets. For this example, we’ll name our variable “data”.
Your script should now look like this:
8. Create your "STORE" script
Note: Before continuing with this step, it would be easier if there already exists a CSV in your cloud storage which can be used as a placeholder. If it doesn’t exist, simply place an empty CSV to be the placeholder. Make sure the CSV is in the folder to where you wish to export your script.
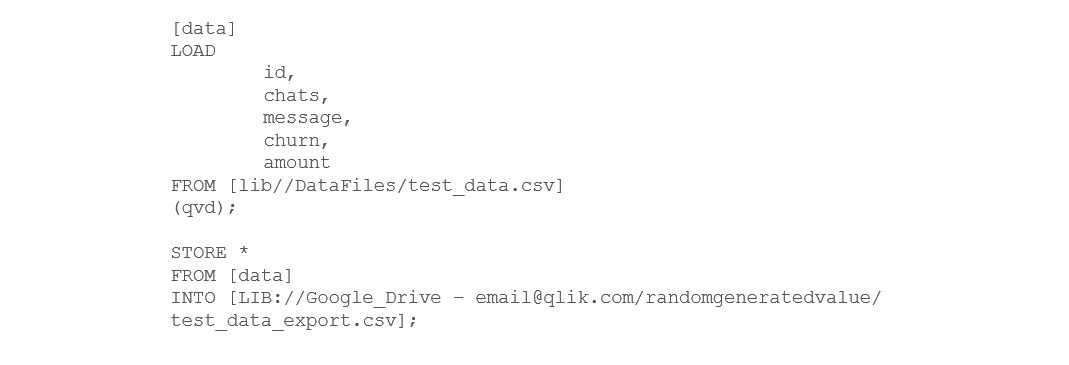
This is the part where we export our data to the cloud storage. Click on the “Select data” icon under your cloud storage connection in the connections pane and select the placeholder CSV and then click “Insert script”. This should give you a “LOAD” script. We’ll replace “LOAD <columns> FROM” with “STORE [data] INTO”. We’ll also rename the file name and replace the last bit between parentheses with a semi-colon ( ; ).
The export script should look like the following:
Your final script should look like the following:
And this is how it all comes together.
9. Hit the "Load data" button at the top right of your screen
Your data should now be in your cloud storage.
For information about Qlik™, click here: qlik.com.
For specific and specialized solutions from QQinfo, click here: QQsolutions.
In order to be in touch with the latest news in the field, unique solutions explained, but also with our personal perspectives regarding the world of management, data and analytics, click here: QQblog !


