How to…

How to assign control points

QR-Patrol is a real-time monitoring and surveillance system, specially designed to improve and streamline the activity and management of security and protection of companies.

It can also be used successfully in monitoring the activity of cleaning staff in hotels and office buildings.

It includes several innovative features and offers the possibility to monitor all your locations with a single position determination, with the help of a smartphone.

Once you download the mobile app, you can take advantage of all its features and send immediate incident reports to the monitoring center.

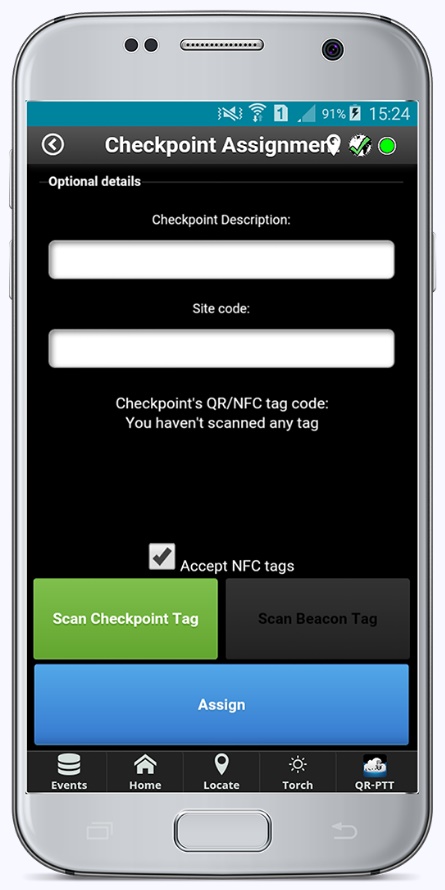
At first, one of the first tasks to be performed is to assign control points.

Assigning NFC control points

  • On the main screen of the mobile application, press the “Assign” button to choose the Control Points.
  • Drag the NFC tag to the back of the device (make sure the NFC feature is active on that phone).
  • To tag a specific location, click the “Assign” button in the Web Application Control Points tab (Company -> Control Points), select a Point from the list, click “Edit,” and choose the client and location you want.
  • Alternatively, you can add a description and fill in the unique location code (found in the web application, in the Clients: Clients -> Details tab).Finally, press the “Assign” button and the checkpoint is ready!

Assigning QR-code control points

You can assign QR-code control points right from your device by following the steps below. Alternatively, you can assign them from the mobile app in two ways:

  • Click the “Company” button on the left side of the navigation bar and choose “Checkpoints.”
  • Select one of the control points in the list and click “Edit”.
  • Choose the Client and Location to which you want the control point to be assigned from the two drop-down lists that appear in the (Assign Now) pop-up window. Save your changes by clicking the “Confirm” button.

Or

  • Click the “Customers” button to display your customer list, and then click the customer you want to assign to the QR tag and choose “Edit.”
  • A window will appear, which at the bottom will have a list of your client’s locations. Click the “Add” button to add locations for this client and for each location; you can assign control points by clicking “Manage Points”.
  • Once you have chosen “Manage Points”, a pop-up window will appear. At the bottom of it is a list of all checkpoints. To add one or more of them to that location, check the desired one and press the plus sign. Finally, to complete the action, press the “Confirm” button.